
How to Adjust a Sewing Pattern for the Best Fit
Just as all clothes you purchase in the store are not a perfect fit, sewing patterns also vary so that they need to be adjusted to get a good fit. There are multiple methods of fitting patterns from pinning the tissue pieces together to create a paper garment to making a sample garment out of a cheap fabric like muslin. Although either of these methods may be preferable to you, there is a simple way on how to adjust a sewing pattern that will take less of your time and give you just as accurate a fit.
Most advice on how to fit patterns often starts with taking your measurements and writing them down. It is nearly impossible to do this yourself and many people are uncomfortable asking someone else to take their measurements for them.
Although you might think a “custom fit” starts with matching the pattern to your measurements, this isn’t entirely true. Pattern pieces need to be cut with a certain amount of “ease” or extra room, requiring the best-fitting pieces to be a little bit larger than your actual measurements. Otherwise, the garment will be binding and won’t move with you.
The Garment-to-Garment Fitting Method
Most of us tend to tend towards similar styles in the clothes we wear in regards to style and the way they fit. That means that whatever you are preparing to make, you probably have something similar in your wardrobe. Select a similar garment that you can wear comfortably and that is made of a similar type of fabric. If you are happy with the way this garment fits, using it as a guide to fit your pattern should produce an equally well-fitting garment.
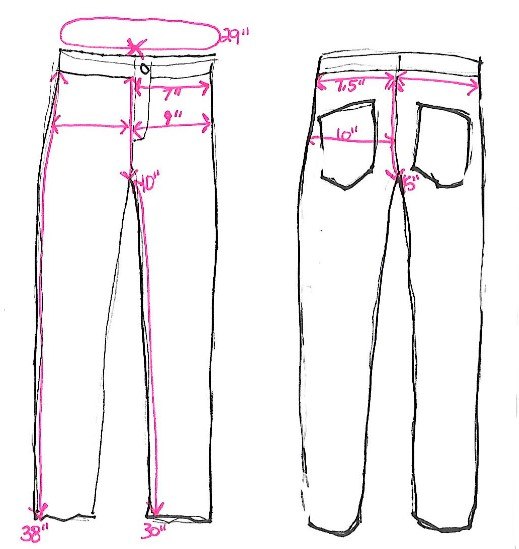
Select a garment that is as close to what you are making as possible. Regardless of the style, there will be several key areas that you will measure. For example, when making a pair of pants, you will need the waist and hip measurements, along with the lower waistband to inner inseam measurement in the front and back and the length from the outer lower waistband to the hem and the inside inseam to the hem. These measurements can differ according to the style of the pants and those without a waistband should be measured from the very top.
For a blouse or top, you will want to measure the bust, waist, shoulders, shoulder-to-hem, and underarm-to-hem. If the top has sleeves, you will also want to measure the length. Some new tops are made in tunic styles that come down over the hips. If that is the case, you will want to measure here, too. If you don’t have any tops this long, use your own measurement to make sure the pattern will fit here as well.
Get It Down on Paper
You don’t have to be a great artist to draw the pattern pieces but you can trace them from the sewing guide if needed. Leave enough room around the edges to place your written measurements.
Next, draw a line across the area that you will be measuring and place arrows at the ends of the lines to indicate which direction that measurement is for. For example, if you are measuring across the top of a piece of pants pattern, use ←------------------→ and place the measurement either at the end of one of the arrows or in the center of the line. Although the pants pattern will either be for the back or front and you will cut out two pieces of each, measure for a single piece as you did in your garment sample. Do not round off the measurements. If you add 1/8th of an inch to one pants piece, by the time you cut all four pieces, you will be adding ½” to the overall fit and that will sabotage your fitting efforts!
The seam allowance on most standard patterns is 5/8” unless otherwise noted. Since this is not usually marked on the pattern, you will have to keep the seam allowance in mind when measuring the pattern. The same is true for hems and do not include darts or pleats in your measurements.
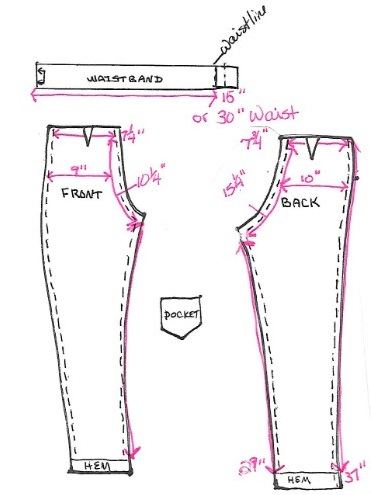
Once you have all of your drawings completed, you can compare the drawings you made to determine what changes need to be made. In the example above, we can see we need to make the following changes:
-Reduce the back waist by ¼”
-Reduce the front waist by ¼”
-Reduce the back inseam by ¼”
-Reduce the front inseam by ¼”
-Increase the hem length by 1”
-Reduce the waistband by 1”
Place the pattern pieces on the fabric according to the pattern layout. Since the only increases you will be making are to the hem, the alterations you make to the pattern won’t interfere with the spacing of the pattern pieces on the fabric other than the bottom of the pants pattern. Allow for an extra inch of fabric at the hem.
With the pattern pieces firmly pinned to the fabric, use a sewing marker or chalk to outline the top of the pattern where the alterations will be made and several inches below. Unpin the top of the pattern and fold it over so it is out of your way. Measure and mark the outside seam at the waist ¼” inside the pattern line. Use a ruler to taper the line downward into the seamline. Do this for both the front and back pieces on the outside seam only.

Place the edge of the pattern on the newly marked line and pin in place. If there are darts or pockets, as in this pattern, shift them 1/4” towards the inner seam to keep them centered.
The same approach is used to reduce the inseam. The ¼” reduction is taken from the top and it will extend across the entire pattern piece. The dart will also need to be lowered by the same ¼” increment.
Adding to the measurement works in the same way as reducing does. For the added 1” to the hem, add the additional inch to the bottom of both pattern pieces and drop the hem line indicated on the pattern the same amount.
Finally, don’t forget to adjust the length of the waistband so that it fits the pants once the pieces are sewn together. This waistband is cut on the fold so you will need to reduce the length by ½” to get the 1” reduction. Adjust the line for the center waistline by the same amount.
When fitting a pattern for a top, there may be several more pieces to work with than with pants or skirts. If you are using a pattern that has front and/or back inserts, you will need to consider the seam allowance for each piece when taking your measurements.
Changing the size of the bodice will also require you to change the size of sleeves, collars and collar bands, facings, and interfacings. Start by fitting the bodice pieces and listing the changes you need to make to the pattern. Any change made to the bodice and/or the shoulder seam will have to be duplicated in the sleeves. Adjusting either of these seams will affect the size of the armhole. Try to avoid patterns that require adjustments of more than ¼” to prevent the need to alter the armhole significantly.
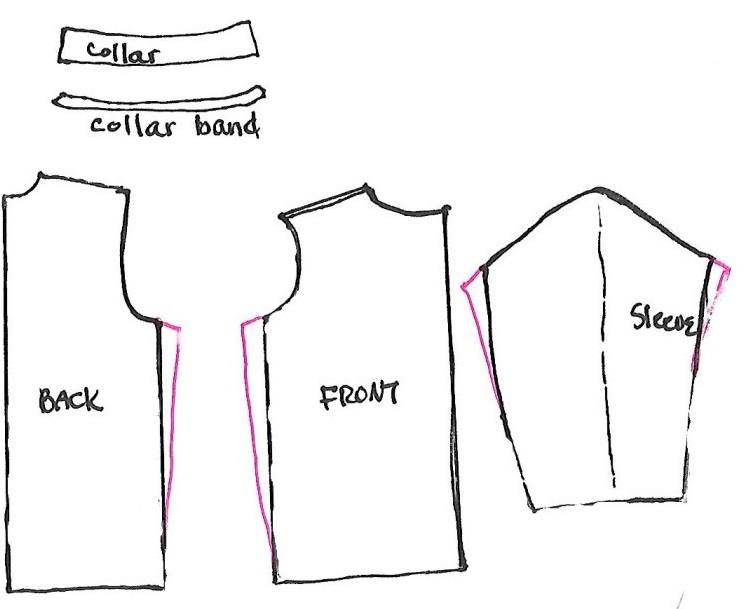
Changes to the shoulder seam or the front opening will change the fit of the collar and collar band if one is included in the style. Any piece that requires a facing or interfacing will also need to be adjusted for length or style changes that affect the area where they will be used.
A Possible Exception to the Rule
Sewing with stretch fabrics is more challenging when fitting a pattern because of the variations in stretch. Try to stick with similar fabrics until you have mastered the garment-to-garment fitting method and have a better handle on how to accommodate special needs.
Practice Makes Perfect
Everyone’s body is made a little different, making it more challenging to get a perfect fit from any pattern. Although you may not get perfect results the first time, after a few attempts you will be able to adjust any pattern to make it fit like the go-to pieces that you love to wear.
